
This project has been my favourite project so far because of the progress I have made as a Modeller and Lighting Artist and the technical problems that I have encounted along the way. I have also enjoyed working with the people in my group and I am supprised how we managed to stay professional even though the odds were against us finishing our project.
During the begining of the project we all decided to go a dark horror genre for our enviroment which was different to everybody else's. I think we gave ourselves a huge task by creating a simular mansion to the one in Resident Evil and by including 3 extra rooms. As a group we were very passionate about the idea which gave us the belief that we could deliver this project to a high quality.
As a group we collected alot of visual research from films, games and places such as the
Dennis Sever House. There was no point in the project where I felt that I was running out of ideas or had a problem visualising what our enviroment would look like. After our research, we began to put together some concept images.
The breif stated that we needed to include some animation that interacts with the enviroment. Our main interactive pice of animation is the book case opening in the study section of the mansion. Later on, Jared helped us with the story to our animation by suggesting that we could animate the camera as if it were a zombie walking through the mansion. This was a great idea as it meant that we could play with the audiencees preception of the main character. Once we had the story plotted out, we swiftly moved on to the storyboarding and started to model objects and rooms in the mansion. The modelling process started slowly and gradually picked up pace towards the middle of the term. We were gradually seeing the mansion coming together and we had a strong belief that nothing could go wrong.
Two of of us began to UV Map and texture parts of the mansion while the other finished off the modelling. At this piont in the the project, the work load from the modelling was taking affect on us as we were begining to feel tired and exhausted. After texturing 4 objects myself, I new we had an up hill battle with this part of the production pipeline. Our models looked fantastic, but were a pain to texture as some models had curls, swirls and intricate detail. This did not phase us as a group and we carried on texturing. We ran into problems such as the textures stretching or not showing up. If one of us found something hard to do, we would get someone else in the group to do it if they knew how. Time was of the essence with our texturing as most groups were lighting their scenes and test rendering on Vanguard. We felt the pressure on us, but if that was not bad enough, Maya started to CRASH!
This was one of the most lowest points in the project for us as none of us could open or navigate through Maya with out it crashing. We couldn't even finish our texturing because Maya would not let us Render single frames. There were some positives things at this point in the project like Stewart learing how to render fog and myself learning how to render glass. The project was all over... until we came up with an idea to seperate the rooms from each other.
IT WORKED!
Whilst we were desperatly trying to finish our texturing, Stewart animated the camera.
During the penalterment week we lit the mansion and put in the fog effects which brought our textures and bump mapping to life. It was at this point in the project where our mansion looked realistic and finished. We had some trouble with the shadows not rendering out properly but I managed to correct them and give them lush and realistic look.
After we finished the lighting, we needed to render desperatly as we only had 2 days till the deadline. We succesfully managed to batch render the Study, Corridor and Basement which only left us with the Main Room. The Main Room was an absoloute living Nightmare to render. We were luckily given an extension for the project. My team mebers were setting up jobs for the Render Farm but they were all failing due to the fact that they didn't set it up properly. I asked Tom from Team Authentic to teach me how to use the Render Farm and he did a really good job and practically saved our whole project. Now that I was only one in the group who could use the Render Farm properly I used the oppotunity to render as much footage as I could of the Main Room and left it over night.
The next day we realised that the Render Farm skipped some frames so we batch rendered the missing frames whilst Spencer edited the footage we already.
Jared came into the room just as I had finished burning our project on DVD. We were the last group to finish but it was worth it from the results of our film.
If I were to do this project again I would go for the same style but just sticking to 1 or 2 rooms instead of 4.
In the end I think that it was our passion and determination as a group that helped us to finish this project. Even with the low points that we had during this project, we never once fell out with each other. We just got on with the work because we knew what needed to be done.
WE DID THE IMPOSSIBLE AND LIVED TO TELL THE TALE!
Ashley (recovering lol)
Friday, 19 December 2008
Tuesday, 9 December 2008
Shadow Correction

Okay the shadows have now been smoothed out but I finding it hard to see some parts of the mansion. There are alot of lights in this scene, so be prepared to wait 3-4 minutes for it to render. This was rendered in Mental Ray and it didn't crash at all.
Grainy Shadow Problem
 Spencer had the same problem I had with rendering shadows so they become smooth. I am going tweak around with this to try and accomplish some good shadows.
Ceiling Textured

Had some problems saving photographic textures as targa's so I justmade my own on Photoshop and Bumped it.
Wall Candle

We now have a source of light. I used half of the candle from the main room and mounted it up.
Window Light

The window light was originally casting a huge solid unatural shadow on the wall, so I decided to put in a point light help illuminate the wall and also enhance the light hitting the floor. The point light is subtle and puts a green-ish tint in the corner of the room which conveys a ghoulish and chilling tone without the room being too dark.
The essence of this is to create night time lighting without making the scene obviously dark.
Need to Add Wall Light

I'm happy with this render and the reflection on the book case from the window. Now I need to add in the wall light as a source of light.
Study Update

This is a shot with the shadows smoothed out and caustic reflections. I had some problems with the shadows and the balance between the two lights. Stewart helped out with this problem by clicking on "Use Mid Dist" and turning it off.
Monday, 8 December 2008
Still Tweaking
 We have 4 days left to submit this project. I will be able to finish the lighting by tomorow.


Window
 I have also added a new window with a transparent glass texture so that light can shine through.
Continuing with Study Lighting
 I have been tweaking around with the lighting and rendering to create a scary but realistic lighting that gives the impression of somebody living their.
Thursday, 4 December 2008
Textured Walls
 I was origianlly going to choose a patterned texture but I didn't want it to clash with the dominant pattern from the carpet which I like. In the I decided to texture the walls with a complimentary "yellow sand" colour which keeps the colour theme consistent.
Study with added Objects
 Spencer and I have added in the furniture and objects that we made previously. I am pleased with the composition and the general look so far. We want to give the impression that someone is already living their.
Walls upstairs in the main room
 I managed to do the wall texture for the first floor in the main room. As you can see in the picture, the wall is picking up reflections from the rest of the room. I have solved this problem by bump mapping the walls.
I have given Spencer the UV Map and textures for this wall so that he can texture on some mounted pictures.
Cello
 The cello has been textured. I ran into some trouble texturing the cello because mesh was too complex and some face were hidden or inside out. I spent a short amount of time re-editing the cello's mesh and then finally applying the long awaited textures.
Study Window

I have duplicated the window from the main room into the study. I think that it will add consistency to the mansion as a whole and the shadow patterns cast from the window should look appealing.
Friday, 28 November 2008
This Week and Beyond
This has been a texture MAD week! All 4 of us have put a lot of effort into texturing this week and last week and so much progress has been made. I have grasped the techinique of UV mapping which I'm am extremly happy about because it is important to be able to UV map and texture in the Computer Games Industry. One of the latest techniques I have learnt is the Bump Mapping which has been very useful for making my textures stand out. Everybody in our group is addicted to the Bump mapping process which can only be a good thing! ^_^
My latest struggle has been with texturing glass. I ran into this problem last Friday when I was texturing a wine bottle. I asked Josh for some advice and he said to make it transparent. I tried but it didn't have the characteristics of glass like the reflections. I found a lovely tutorial on the internet that was very easy to understand you can find on my tool bar on the left hand side. I used this tutorial religously trying to get the best result I could get. Well, my first attempt is the first image of my wine bottle that I posted up. I stayed late on Tuesday night tweaking the Ray Trace values and lighting to finally get a glass render that the and I were over joyed about. Now that I have over come that hurdle of making glass I can now render the windows and the ink bottle for the Study. Spencer wanted me to do a Crystal texture for the Shandelia so that will be one of my next tasks (I LOVE RENDERING).
Last week we had guy come in for 2 days called Rob Jones. This guy was fantastic! He showed us how to render our scenes in layers on Maya and After Effects. We were also shown a film that used the technique of rendering in layers and compositing. I was fortunate enough to have with me a book that I ordered called "Mental for Maya, 3D S Max and XSI" by Boaz Livny. Rob told me that it was the best book on the market for teaching people how to use Mental Ray, so that was reasuring to hear. So far I have read about the creating soft shadows and what each type of light is good for and how to use them effectively. Earlier on, I did some practice renders with lights in the main room. I had a problem with the shadows, as they became distorted and looked like some sort of "cross hatch shading". I need to get some help from Rob on this issue as the deadline is looming.
We have come along way since the begining from this
to this!
My latest struggle has been with texturing glass. I ran into this problem last Friday when I was texturing a wine bottle. I asked Josh for some advice and he said to make it transparent. I tried but it didn't have the characteristics of glass like the reflections. I found a lovely tutorial on the internet that was very easy to understand you can find on my tool bar on the left hand side. I used this tutorial religously trying to get the best result I could get. Well, my first attempt is the first image of my wine bottle that I posted up. I stayed late on Tuesday night tweaking the Ray Trace values and lighting to finally get a glass render that the and I were over joyed about. Now that I have over come that hurdle of making glass I can now render the windows and the ink bottle for the Study. Spencer wanted me to do a Crystal texture for the Shandelia so that will be one of my next tasks (I LOVE RENDERING).
Last week we had guy come in for 2 days called Rob Jones. This guy was fantastic! He showed us how to render our scenes in layers on Maya and After Effects. We were also shown a film that used the technique of rendering in layers and compositing. I was fortunate enough to have with me a book that I ordered called "Mental for Maya, 3D S Max and XSI" by Boaz Livny. Rob told me that it was the best book on the market for teaching people how to use Mental Ray, so that was reasuring to hear. So far I have read about the creating soft shadows and what each type of light is good for and how to use them effectively. Earlier on, I did some practice renders with lights in the main room. I had a problem with the shadows, as they became distorted and looked like some sort of "cross hatch shading". I need to get some help from Rob on this issue as the deadline is looming.
We have come along way since the begining from this

to this!

I am very happy and proud of what we have achieved so far as a group. I can already visualise the lighting and I can't wait to back on to this on Monday. Because we are short on time, Stewart will be animating the camera next week while Spencer and Josh is texturing the final bits. I will be starting the lighting as next week is our last week.
We have have cut so fine to the deadline but the out come should be Mind Blowing!
Tuesday, 25 November 2008


It took alot of tweaking!

Okay, I've managed to create the wine bottle with some vrolume to it. I've also played around with the specular shine and the lighting which seems to make the glass effect stand out. I need to look into caustics and photons a bit more so that i can get a decent reflection.
I've turned a new page in this chapter! hehe
Wine Bottle

First attempt at rendering the glass wine bottle. I am having trouble with the transparency and specular shine. I'll experiment a bit more with it so that the whole bottle doesn't become transparent.
Thursday, 20 November 2008
Stair candles Textured
 .
.I am going to cut the stair candles in half and use the on the walls in the study


Monday, 17 November 2008
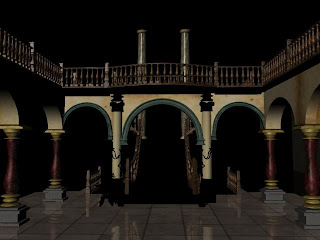
Lighting the Main Room

 I have asked my family which image has the spookiest lighting and they all voted for the blue light.
Sunday, 16 November 2008
This week and beyond
 This week I was determined to get some textures in our mansion as we are pushing it for time. On the week end I had ago at laying out UV's and texturing. This extra bit of practice payed off when I came in for the the next morning so I could get straight to the texturing while the other guys where adding the final touches to the main room.
 Whilst I was texturing, I was realising that I was taking along time on the texturing one object. I think that the reason it took me so long is that I was trying to create a realistic texture in Photoshop.
In the image above is one of my UV textured objects. I am pleased with the result and the fact the the UV mapping has worked, but I feel I need more practice after listening to Jared's mini lecture he gave to our group on UV mapping on the Thursday. I remember him talking about stretching and relaxing UV's because surfaces may not be even. I am going to take in account the (stretching and relaxing) for the more complex models.
During this Project I feel that I have improved as a 3D Artist and that I am getting better by the day. Helping others in my group has opened me up to problems that I have never come across and helps me to problem solve faster.
My Formative Asessment with Dan Dali was a success as I have managed to get two questionaires ^_^. My questionaires from Ubisoft and Chase London, have helped me to confirm that I want to progress as a Modeler in the Games industry. Speaking to a Games Animator and the Euro Gamer exhibition was refreshing and gave me a morale boost.
Overall, this week has been good so far because we have finished modeling the main room.
Things to do for the next 4 weeks is;
1) Model the Study and the Torture Chamber
2) Texture EVERYTHING! (Hehe we can do it guys ^_^)
3) Lighting
4) Animate Camera
A lot of work to do with PPD and everything else we have in our lives but its possible.
Saturday, 8 November 2008
This week and beyond
This week I have managed to create the candles for the main room. The progress on the main room is being maintained and is starting to take shape. I have notice that we are over half way through the term with about 5 weeks left till we hand the project in.
For next week I know that Spencer is going to be working on the shandelia. He has shone me a picture of the shandelia that he is basing his one on at it looks like crystal and glass will be used to texture it. I'm looking into rendering glass and crystal.
Because we have 5 weeks left till the hand date, I am going to make a start on the texturing as that is one of the longest processes with things tending to go wrong. I'll also bring in my External hard drive to store maya files and textures for the group as our college computers only allow us to hold 1 MEASLY GIG! WTF!
I have a CD which has alot of useful textures on it which will come in handy ^_^. I'll bring that in on the Tuesday Guys! I also have a book that tells you how to create certain textures in Photoshop STEP BY STEP! yes I said it Step by Step! I will up load some after I've finised writing this.
Overall, I am pleased with the progress and the speed we are working at. Everybody is enjoying the project which is the most important thing and everybody is going out of their way to make this Enviroment the best it possibly can be. I would like to see some textures done next week in the main room but at the same time we can still model because there are enough of us to do that ^_^
We own! Yeah!
Thursday, 6 November 2008


Tuesday, 4 November 2008

Resident Evil
 Screenshot from the game "Resident Evil"
I chose this image because of the cold blue tinted lighting and the
way it portays feeling alone with the shadows framing the image.

Hostel
 From the Film "Hostel"
I like the minimal use of lighting and objects. The less you see, the
more scarier it becomes.
Dennis Server's House (Inside view)

I managed to get a photograph of the steps inside the house where it leads down to the basement. This is the sort of stairs that we want to lead down to the corridor. The brick walls and stone floor look grim and the fact that walls are so narrow creates a clostrophobic feeling which we wanted to incoporate.
Risky Photography
 This is another photograph taken in the Design Museum.
I got way with it... again lol but it was worth it though. This piece has giving me an idea of creating a statue for the mansion. It's unlikely as we are tight on time for the moment. but it would be nice ^_^
Design Museum
 This Photograph was taking in the Design museum. I thought it was quite scary and unusual. I like the contrast between the black and white photography and the coloure illustrations.
 It would make a haunting portrait in the Resident Evil mansion.
How we came to a Final Idea, which everybody agreed with
First an foremost, as group we all have one thing in common, which is a passion for violent films and computer games. Naturally, we began to talk about creating an environment with a dark and miserable atmosphere. Stuart, a member of our group came up with an idea of creating a dungeon scene where the main character would have to travel down a flight of dark steps to witness the terrifying horror. I listened to the idea, and liked where he was heading with it. I liked the dungeon idea because dungeons tend to have no windows and minimal light sources, which would give us the opportunity to play around with shadows and flickering lights to enhance the scary mood we wanted to portray.
With a dungeon idea in mind we told Josh the idea who was happy to hear that we were directing our ideas towards horror. We decided as a group to hold a team meeting on the Friday in the year 2 animation room. It was in this meeting that we brainstormed all our ideas on to paper. We put down influences such as, The Decent, Theif 3, Hostel and Resident Evil. After the brainstorming session, which took about 45 minutes, we went onto YouTube to look at some video clips of scary films and games. This was very helpful because it aloud the group and myself to point out what we liked visually. Once we had gotten bored of looking at horror games and film on YouTube, we photocopied the brainstorm and gave everybody a copy so that we could find some more visual research. During the brainstorming we highlighted the influences and ideas we liked so we knew what to research.
Josh and I did some research in the LRC, looking into Gothic architecture. I found images of stairs entrances that looked similar to the Resident Evil ones. Josh did some drawings in his sketch book of the arch ways that he wanted to put into the mansion. We photocopied the images of gothic architecture that we wanted. I also took out two books which I thought could help myself and the others with the making of the environment. The books are called “Digital Lighting & Rendering” by Jeremy Birn and “3D Game Textures – Create Professional Game Art using Photoshop” by Luke Ahearn. The texturing book also came with a CD with holds royalty free texture which I may use. (hehehe).
When I got home I started on some digital painting for the concept of the corridor which was inspired by Hostel.
The next time we met up as a group Josh and I brought in some books to help up visualise what we wanted our environment to be. Josh brought in a Resident Evil game guidebook, which had screenshots of the game play. I brought in two books on Art Nouvea architecture and furniture and screenshots of the Hostel film, Condemned 2 and Soul Reaver. From the research we had brought in we decided to created the interior of the Resident Evil mansion entrance. The reason for the Resident Evil entrance is that it looked haunting and spooky without being too obvious. Secondly, we chose to include a dark corridor inspired by the game Max Payne , where the audience would hear sounds of crying babies and things of that nature that would scare the audience psychologically. Next, we wanted to include a Study room that had a secret door passage behind a book case, which would lead to a torture chamber below the study. The look of the study was inspired by the baroque interior and the images of Condemned 2. The torture chamber was inspired by the images of Hostel that I had brought in.
Friday, 31 October 2008
Cello for the Study

Final Cello for the Study. I thought the Type writer would take to long to make so I thought a creepy cello in the study would do the trick.
Thursday, 30 October 2008


Wednesday, 29 October 2008


Subscribe to:
Posts (Atom)